4.1 Using the ICP ledger
ICP is the native token of the Internet Computer. It has two key functionalities on the network:
ICP tokens are converted into cycles, which are then used to pay for canister computation and resources. This process was covered in 1.4 Acquiring and using cycles.
NNS participants are rewarded in ICP tokens for staking ICP in neurons and actively participating in voting. You'll dive deeper into NNS rewards in 4.4 NNS governance and staking.
To interact with the ICP token, a specialized canister known as the ICP ledger canister is used. It holds ledger accounts and records a traceable history of all ICP transactions.
In this tutorial, you'll dive into how to deploy a local instance of the ICP ledger canister and how to interact with it. To test a project that integrates with the ICP ledger before deploying it to the mainnet for production use, you will need to deploy a local instance of the ICP ledger canister. The local instance will not have the history and balances that the mainnet ICP ledger contains.
The ICP ledger can only be used to interact with ICP tokens; to interact with other tokens, such as ICRC tokens, an ICRC ledger will need to be used. That ledger is covered in the module 4.2 ICRC tokens.
Accounts
An ICP ledger account is identified by the AccountIdentifier value, which is a value derived from the account owner's ICP principal and subaccount identifier. Accounts can only be owned by one principal; however, since a principal can refer to a canister, joint accounts can be implemented as a canister.
The ICP ledger uses AccountIdentifiers instead of just using principal IDs since AccountIdentifiers allow a principal to control multiple accounts. Accounts can include a subaccount, which is an optional bitstring that distinguishes between different accounts under the same account owner.
If you are familiar with an Ethereum or Bitcoin user's public key, a principal identifier can be thought of as the ICP equivalent. When you use a principal, your corresponding secret key is used to sign messages, authenticate with the ledger, and execute transactions for your account.
Transaction types
There are three types of transactions:
Minting: Generates a new token for an account.
Burning: Eliminates a token from existence.
Transferring: Transfers ICP between accounts.
All transactions are recorded in the ledger canister as a hashed blockchain. The ICP ledger canister runs on the NNS system subnet on the mainnet.
When state changes are recorded, each new transaction is inserted into a block and assigned a unique index value. The entire blockchain is authenticated regularly by signing the latest block using a signature. This signature can be verified by anyone using the root public key of ICP. The ledger can be queried to retrieve specific transactions.
Deploying the ICP ledger locally
To deploy the ICP ledger canister locally, there are two workflows:
Using the
dfx-nnscommand to deploy an entire instance of the NNS locally, since the ICP ledger is part of the NNS. This workflow will install an ICP ledger canister with the canister ID ofryjl3-tyaaa-aaaaa-aaaba-cai. This is a straightforward workflow, but it is heavyweight in the sense that it installs other several canisters in addition to the ledger canister.Deploy the ICP ledger canister locally using its Wasm file. This is the method that will be used in this tutorial since it provides greater control over the canister's deployment, such as defining the ledger's minting account, customizing the initialization arguments, and choosing which Wasm version of the ledger to use.
The ICP ledger canister running on the mainnet is not meant to be used for other token deployments. To develop a new token or ledger, the ICRC ledger can be used, which will be covered in a future module.
- Prerequisites
This example is currently not available in ICP Ninja and must be run locally with dfx.
To get started, create a new project in your working directory. Open a terminal window, navigate into your working directory (developer_liftoff), then use the following commands to start dfx and create a new project:
dfx start --clean --background
dfx new icp_ledger_canister --type=motoko --no-frontend
cd icp_ledger_canister
Locating the Wasm and Candid files
Next, you need to download the ledger's Wasm and Candid files from the latest replica version. You can find the latest replica version on the dashboard under the Elect GuestOS version field.
Then, use the following URL to download the Wasm module: https://download.dfinity.systems/ic/<VERSION>/canisters/ledger-canister.wasm.gz. Replace <VERSION> with the replica version from the dashboard.
Similarly, the following URL can be used to download the Candid file: https://raw.githubusercontent.com/dfinity/ic/<VERSION>/rs/ledger_suite/icp/ledger.did.
Now let's open the dfx.json file in the project's directory and replace the existing content with the following:
{
  "canisters": {
    "icp_ledger_canister": {
      "type": "custom",
      "candid": "https://raw.githubusercontent.com/dfinity/ic/<VERSION>/rs/ledger_suite/icp/ledger.did",
      "wasm": "https://download.dfinity.systems/ic/<VERSION>/canisters/ledger-canister.wasm.gz",
      "remote": {
        "id": {
          "ic": "ryjl3-tyaaa-aaaaa-aaaba-cai"
        }
      }
    }
  },
  "defaults": {
    "build": {
      "args": "",
      "packtool": ""
    }
  },
  "output_env_file": ".env",
  "version": 1
}
Creating a minting account
To interact with our ICP ledger, create a new identity that will act as the minting account, then export the account's ID as the environment variable MINTER_ACCOUNT_ID:
dfx identity new minter
dfx identity use minter
export MINTER_ACCOUNT_ID=$(dfx ledger account-id)
Any transfer made from the minting account will make a Mint transaction, while transfers to the minting account will make a Burn transaction.
Now, switch back to your DevLiftoff identity and export its account ID as the environment variable DEFAULT_ACCOUNT_ID:
dfx identity use DevLiftoff
export DEFAULT_ACCOUNT_ID=$(dfx ledger account-id)
Deploying the canister
With these variables set, you can deploy the ledger canister with the following command:
dfx deploy --specified-id ryjl3-tyaaa-aaaaa-aaaba-cai icp_ledger_canister --argument "
  (variant {
    Init = record {
      minting_account = \"$MINTER_ACCOUNT_ID\";
      initial_values = vec {
        record {
          \"$DEFAULT_ACCOUNT_ID\";
          record {
            e8s = 10_000_000_000 : nat64;
          };
        };
      };
      send_whitelist = vec {};
      transfer_fee = opt record {
        e8s = 10_000 : nat64;
      };
      token_symbol = opt \"LICP\";
      token_name = opt \"Local ICP\";
    }
  })
"
In this command, the following parameters are passed:
The ICP ledger canister is deployed with the same canister ID as the mainnet ledger canister to simplify switching between local and mainnet deployments.
The minting account is set to the
MINTING_ACCOUNT_IDenvironmental variable.The token is named
Local ICP/LICP.100 LICP tokens are minted to the
DEFAULT_ACCOUNT_IDvalue.The transfer fee is set to
0.0001LICP.
Since you're using the ICP ledger locally, you will create a local token called LICP that you'll use for local integration testing. This LICP token does not have any value on the mainnet and cannot be used in place of ICP for mainnet transactions.
Interacting with the ICP ledger canister
There are several ways to interact with the ICP ledger, such as:
Using the
dfx ledgercommand, which is thedfxshortcut for interacting with the ledger.Using the
dfx canistercommand to interact using the ledger canister's name or ID.Using the Candid UI.
Using
nns-jsto interact with the ICP ledger from a web application.Using the
ic-cdkto make inter-canister calls from another canister to the ICP ledger canister.
Using dfx ledger
To get your local ledger account ID, use the command:
dfx ledger account-id
Then, to check the balance of that account:
dfx ledger balance $(dfx ledger account-id)
To use the mainnet ledger, use the flag --network ic with any dfx ledger command.
To transfer tokens from one account to another, use the command:
dfx ledger transfer --amount AMOUNT --memo MEMO RECEIVER_ACCOUNT_ID
Replace AMOUNT with the number of tokens to transfer, MEMO with a 64-bit numeric value, and RECEIVER_ACCOUNT_ID with the account ID to receive the tokens.
MEMO refers to a 64-bit numeric value as defined in the IC specification. It is used to generate unique hash values for transactions.
If you send tokens to the principal ID you set as the minter account, you will receive an error that the burn transfer fee must be set to zero. In the initialization values passed to the ICP ledger canister in this tutorial, no burn fee was set, so the default transfer fee was used, which is 0.0001 LICP in this example. You must set the burn fee value to zero if you wish to burn tokens.
Using dfx canister
The dfx canister command can be used to call additional methods of the ICP ledger canister, such as the token's name. To call the token's name, use the command:
dfx canister call icp_ledger_canister name
Output
("Local ICP")
Similarly, the following command can be used to return the token's symbol:
dfx canister call ryjl3-tyaaa-aaaaa-aaaba-cai symbol '()'
Output
(record { symbol = "LICP" })
To query the canister's archives, use the command:
dfx canister call ryjl3-tyaaa-aaaaa-aaaba-cai archives '()'
Output
In this local example, there are no archives that have been created, resulting in the following output:
(record { archives = vec {} })
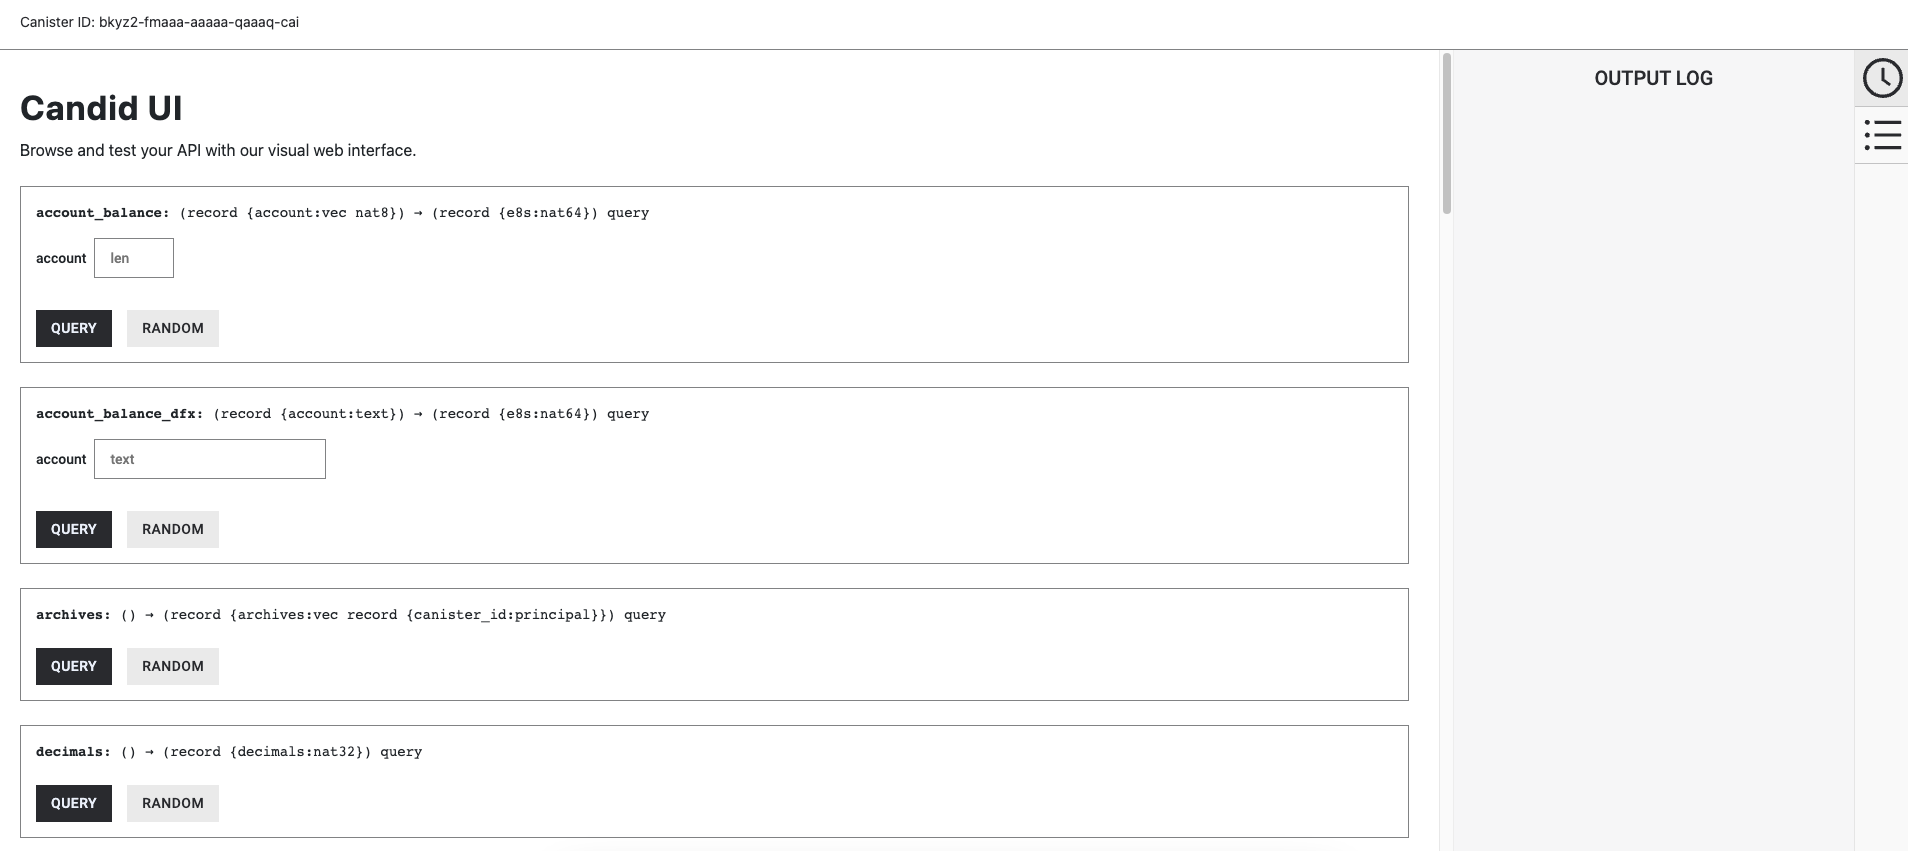
Using the Candid UI
Alternatively, the Candid UI can be used to interact with the local ICP ledger's methods by navigating to the URL provided when the canister was deployed, such as:
http://127.0.0.1:4943/?canisterId=bnz7o-iuaaa-aaaaa-qaaaa-cai&id=ryjl3-tyaaa-aaaaa-aaaba-cai
After navigating to this URL in a web browser, the Candid UI will resemble the following:
Resources
Learn how to use nns-js to interact with the ledger from the web application.
Learn how to use the ic-cdk to make inter-canister calls to the ICP ledger.
 Need help?
Did you get stuck somewhere in this tutorial, or do you feel like you need additional help understanding some of the concepts? The ICP community has several resources available for developers, like working groups and bootcamps, along with our Discord community, forum, and events such as hackathons. Here are a few to check out:
- Developer Discord
- Developer Liftoff forum discussion
- Developer tooling working group
- Motoko Bootcamp - The DAO Adventure
- Motoko Bootcamp - Discord community
- Motoko developer working group
- Upcoming events and conferences
- Upcoming hackathons
- Weekly developer office hours to ask questions, get clarification, and chat with other developers live via voice chat.
- Submit your feedback to the ICP Developer feedback board